Showing posts with label budget. Show all posts

Fermenting Food For Your Chickens and BEST OF ALL... Saving Money!

Life on the farm for the chicken can be dull and routine except for the occasional discovery of a large grub all for herself. She might live in a dreary coop most of her days, she may find herself regularly chased by the neighbor’s dog, she might witness a serial killer raccoon wipe out her household or endure relentless daily torment from a bossy hen above her on the pecking order.


How is a chicken to get away from it all, get some R&R? You know really let loose?

I submit to you, The Chicken Speakeasy.
Imagine 25 chickens tipped and hopped up. The poultry party could go on all day and the barnyard full of poultry drinking songs. You may have extra chickens showing up at your doorstep asking for vacancies.
What? Yes, sort of, but they are not drunk. I would not do that to my birds. Just a joke here.

In my search for cheaper feeding of my working laying birdies, I ran across great information on self-feeders, maggot breeding stations, cracked corn, and rotational grazing. All of these methods are pretty good and all merit attention. Someday soon I will be making the maggot feeder. What caught my eye was the “wet feed”. When you feed your poultry the standard pellets they are dry. The theory is that the chickens will consume more food if it is dry and then drink great quantities of water. Simply add water to the feed pellets and they are fuller faster and eat less. If we stopped right now and this is all you took away from my article, you would be a blessed poulterer indeed. Because it is true. I know it is because I have seen this myself. But wait a minute there is more.

Further study started to reveal some interesting information. Folks were adding apple cider vinegar to the birdy drinking water to reap lots of benefits. They were also sprouting or fermenting the grains they were throwing out to their poultry. Oh yes. First thought I had was, “These people must worship their chickens.” And they may actually do that, what do I care. But the fact is that the reduced food consumption may outweigh the costs of spending so much money on grain. On our place we do not worship or pamper the ducks and chickens. No grain. They get Layena, kitchen scraps and forage to their little hearts content. Pretty good, I think. I started mulling all these ideas around and eventually thought- What if I fermented the Layena pellets? Turns out that I am not the girl genius who first thunk it.

In any case, I followed the basic instructions a gal gave for fermenting her grains she threw to her Cornish Cross meat birds. A couple days later I had some seriously rockin’ poultry feed ferment going on and decided the party was going to begin.

Upon my approach to the coop that morning I was greeted with hello songs. When I poured the slop in the pan, they were looking at me like I forgot something. No one touched it. Sigh. Whatever… you can just stay in there until you eat it. No foraging for you! Next day I waited until afternoon to check on them just to make sure they had gotten hungry enough to eat the food. I got my customary happy greeting and when I dumped more hooch in the pan they all dove for it like there was a sale at their favorite store. Wow. These birds were already hooked. Even my ducks liked it. The Chicken Speakeasy was in business.

Since I began this I have seen my feed rate drop to an unscientific "guesstement" of about 60% of what I used to shell out. Around these parts a 50lb bag of Layena is $18 and I fully expect that price to skyrocket this year with the corn issues and drought. This is why I searched for answers in the first place. The bonus is that my birds are healthier, happier and the coop smells better too.

Okay so how does it work?

This project will take you 5 minutes and $10. Less if you have stuff lying around.
1 – 5 gallon bucket $3
1 – 5 gallon Lid $2
1 – 2 gallon bucket (free at the bakery)
1 – quart bottle Bragg’s ACV $5
1 – Drill
Water
1-100 Chickens who want to party


Basic instructions are you start with a plastic trash can and a 5 gallon bucket, if you have a large flock of birds. Smaller operations can just use a 5 gallon bucket and a 2-3 gallon bucket. Whatever the case, you will need a lid for the larger container to keep out the unfriendlies.


Fermented Chicken Feed Fermented Goat Feed Fermented Goat Feed


Drill a lot of holes in your smaller bucket bottom and up the sides. My picture here shows the holes drilled only on the bottom. You need small holes or too much feed comes through the holes when it gets lifted out. Plenty of holes will ensure enough water escapes when you lift it. You’ll see why soon. Dump a couple cups or a quart of apple cider vinegar (ACV) into the larger bucket/trash can. The ACV must be unpasteurized. The most commonly found brand is Bragg’s. Fill your bucket or trash can no more than half the height of your smaller bucket. Now fill your small bucket about half full of feed: grain or pellets or a mix. Push it into the water ACV until it floods through the drilled holes. Looks nasty? Just wait, it gets worse. Put a lid on that thing and I recommend you put it in your garage. Not in the house and not outside where something may get into it. I let my lid breathe it a bit.


Fermented Chicken Feed Fermented Goat Feed Fermented Pig Feed Fermented Livestock Feed

(The basic set up before ACV and water)


Some folks love the smell of ACV- I am one of those “interesting” people who do too. When you check the fermenting feed in a couple days, it should be ready to feed your eager birds. You know it’s ready if it is bubbling. Give it a gentle stir just to see what going on. Yep, it smells stronger. Perfect. Carefully pull your small bucket up and let it drain out as much liquid as you can. You could lay a couple sticks across your larger bucket and set the draining bucket on that to save your fermentation liquid. Come back in 20 minutes. My first attempts at draining were NOT with my revolutionary-amazing-super stick trick. Hah! I made a mess of it those times. More holes drilled into the side of the smaller bucket also help drain off the hooch. Add more water to the larger bucket if you need to, possibly every day.
Fermented Chicken Feed Fermented Goat Feed Fermented Pig Feed Fermented Livestock Feed


(Your ferment could look either way, but pic#1 is ideal)


After the first batch, you will get faster results because you have more fermented liquid to work with. One day should be fine to complete fermentation. Keep the stuff out of the cold weather to speed up things. You do not need to empty all the fermented feed out of the bucket before adding more pellets or grain to start working.


If you like the small 5 gallon bucket size and want to have more feed available for use you could always make more than one system. They are small and store anywhere.

OR go bigger- and use a half sized outdoor trash can. Get one of the shorter types so you can reach in easily. The interior bucket could be the 5 or 6 gallon size. Be sure to drill plenty of holes as this will be heavy to lift out. Either that or you will end up scooping with a nice strong colander. Nothing wrong with that. Just plan ahead.

When we get any other livestock (working animals) we plan on fermenting anything we give them too. Fermented and cultured foods are extremely beneficial for people. Now folks are giving it to their animals so they may share in the benefits. This has been a huge success for our farm and we want the success to continue.

Now that you know, what are you waiting for? Make your own Chicken Speakeasy!


Stop! Don't eat that! -- What foods are the worst for pesticides? The Dirty Dozen

Dirty Dozen InfographicIf you are trying to feed your family better... more healthy, more whole food, less bad fat, less GMOs, less pesticides and so on, then you will appreciate this new info-graphic that has been released.

There is a lot of information here but they have attempted to make it easy for all of us to scan quickly.

For me, I always knew that grapes were "naughty" so I never buy them. Like never ever. Washing them would be impossible. Which is sad because I absolutely adore them. So do my children. I also knew apples had junk on them, but I figured washing them was good enough.
Now I am rethinking that.
Just washing them is not going to do it. These chemicals are IN THE FOOD. Part of it's make up. 

I don't want to fly off in a paranoid frenzy, that's just not me.

However, now I know even more how important my garden is and that I need to ensure that these foods need to be grown myself. 
This is for my family.
It's my job to make sure what they eat is safe and healthy.
If I can't afford to buy it, that's no excuse because I could always grow it... whether in a garden plot, backyard or in containers.

Do you know that 25 strawberry plants are only $15-$25? If you buy the "everbearing" type then you will have strawberries all spring, summer and through fall. Surely you'd have paid yourself back many times. Plus they grow most anywhere and come back every year!! They even send runners so you can propagate more plants or give them to your friends or a family in need. Maybe you can post them on Craigslist for free or for a few bucks? Just don't throw them away. Buy them from a smaller company like Territorial Seed, if you can. Their strawberries are $17.50 for 25.
Tomato plant starts are $2.50-$4 for a 6 pack. Folks, tomatoes are $2-$3 a pound in the store for un-organic. You can do the math yourself to see you are a winner no matter how many tomatoes you get off just one plant. There is no beating homegrown tomatoes.

In any case, you can see that you can make a difference. EVERYONE can grow SOMETHING. The Lord made it easy for us. In today's world there is a lot of free info on the net and youtube videos on every kind of growing method or plant variety.

Your family deserves it.
YOU CAN DO THIS!

[You can click the poster here to see it larger. Then you hover your mouse over and enlarge.]
http://d4h0mkqj50y6.cloudfront.net/wp-content/uploads/DirtyDozenInfographic.jpg

Maple-Bacon Jam.... mmmmm bacon bacon bacon


Stop the presses! 

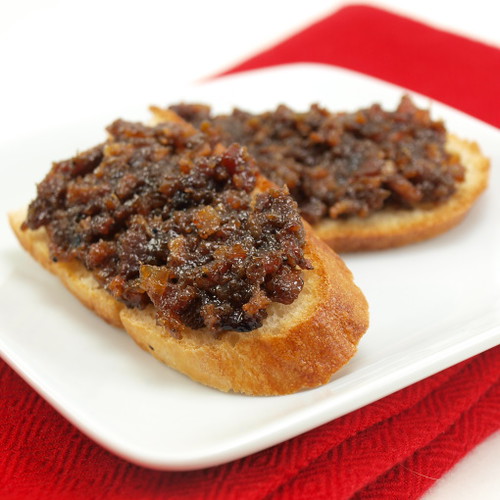
I ran across this amazing jam and just knew the whole world needed to know about it! Stop everyone you see and send out the good news! Hearts everywhere have been dreaming of this and now it has come to fruition! So, let your joy filled heart say, "Yes!" and run to your kitchen. In no time you will have such a delectable delight that angels will sing and grown men cry.

Maple-Bacon Jam

Sweet, salty, smoky, spicy and down right tasty bacon jam that is the definition of YUM! This bacon jam goes well on toast for breakfast and makes for a great condiment in sandwiches and burgers of all sorts! 

Servings: makes 1-2 cups (Recommend you DOUBLE or triple!) 
Prep Time: 10 minutes 
Cook Time: 1 hour 50 minutes 
Total Time: 2 hours 

Ingredients 
1 pound thick smoked bacon, cut into 1 inch pieces 
1 large onion, sliced 
4 cloves garlic, chopped 
1/4 cup cider vinegar 
3/4 cup coffee (brewed) 
1/4 cup brown sugar 
1/4 cup maple syrup 
1/4 cup bourbon, optional
1-2 chipotle chilis in adobo, chopped 
1/2 teaspoon cumin pepper to taste 

Directions 
Cook the bacon in a large sauce pan an over medium heat until the fat has rendered and the bacon starts to get crispy and set aside, reserving 1 tablespoon of the grease in the pan. Add the onions and saute until tender, about 5-7 minutes. Add the garlic and saute until fragrant, about a minute. Add the vinegar and deglaze the pan. Add the coffee, brown sugar, maple syrup, bourbon, bacon, chipotle chilies, cumin and pepper, reduce the heat and simmer until reduced to a syrupy consistency, about 1-2 hours. 
Process the jam in a food processor to smooth it out a bit but not too much as you want to have the texture of the bacon. If you do not finish it all in one sitting, store it in a sealed container in the fridge for up to 4 weeks. 

The Great Purge... De-Crappification 2013: Part 6


All of this time I have been purging and tossing and recycling, I have also been keeping an eye on a section of my garage that has been harboring a potential money maker for my family. The stacks of boxes and odd shaped things that would not quite fit into boxes were neatly and patiently waiting for me to get around to handling them. 

Most of it, about 90%, is the stuff that did not sell at our unbelievably massive garage sale last summer. Okay, I know what you're thinking. No, it is not crap that is not fit for a thrift store. We don't try to yard sale or donate any junk.. that stuff is in the trash where it belongs. What actually happened was that after our very successful money making sale (yay!!!), we sorted the stuff out that simply were worth way too much to just donate. Most of it was boutique clothes that yard salers won't buy because they are looking to spend 50 cents on a Hanna Andersson dress or "high end" wooden toys and so on. (Umm no thank you, I'm not a fool.) The donate stuff went in several van loads to the donation drop. The boutique type high end stuff went into my special stack to await the local consignment sale. As I have been purging my home, I have added the top drawer type stuff to the stack.

Every decent size town has a consignor sale. At the very least, a consignment store. We have a few around these parts. Do a quick search on the net for your area. Most sales, you will find, charge the consignors 35% of their take plus a "building rental & advertising" fee. The one I chose only takes 30% and has a $12 fee. Higher than I prefer, but better than other sales AND the sheer number of customers looking for exactly the kind of stuff I have will be there, with cash in hand. People wait in long lines to get in.


If you want to do something like this, there are some things that might help you decide if you have the potential for making your time worth it.Your items for sale must not be recalled or have noticeable wear or stains, of course. The pricing can be the easiest part. The hanging your items as per the rules and the cataloguing/printing/hanging tags is the real pain in the hiney. Not to mention, time sucker and living room messer upper. Then you must bring all your goodies in, usually at a pre-arranged appointment. They will check your stuff to make sure it is acceptable. (The check in gals told me usually 25% of the items submitted are rejected. I only went home with 7 or 8 things, so they kept making comments on how nice my stuff was. Made me feel good!) The appointment times fill up as soon as the sale gets posted pretty much, so register that part asap after you agree to their terms.

All told, I spent three days preparing for this sale. When I say three days, I mean 7ish am to 7 or 8pm. My item count was around 325. That's twenty "banana" boxes full of clothes on hangers and toys. My dollar amount if everything sold and I did not have to pay any fees was $1100. While the sale is going, you can monitor the progress of your items being sold online at the end of each day. Kind of a nice feature. I'm not sure how many consignment sales can do that.

Now that the sale is over, I am happy to report I sold 265 of my items! Yay! All of my toys sold. Wow! Now I just wait for my check to come in the mail a couple weeks from now. 

BONUS! My house has a lot less stuff in it and I am "free" of it. Not to mention, I made some serious money off of it!

I will keep purging my home and continuing this project of de-crapping. I have far exceeded my goal of getting rid of 30% of our stuff. I am very pleased with myself. It's a good thing for me and my family and... my house is cleaner.

If you love your family, you'll check this out. Seriously.


[Video features empty grocery store shelves and people actually fighting for food and water to put in their carts, waiting in line for stores to open with limited restock, people waiting in car lines for water only to find they ran out, gasoline lines and outages and so on.]

No joke. This is real.

Please prepare for your family now. Emergencies and disasters are commonplace now, no matter where you live.

Do you have a backpack with a flashlight, batteries, granola bars, water, rain jacket, whistle and prescription medications in it? FEMA recommends every person has their own backpack with some basic items to ensure that the person has what they need in an emergency. They also say every home should have a few days of easy to prepare food (nonperishable) on hand and 1 gallon of water per person per day. The RedCross may not be able to get to you for many days. Their websites have information and ideas of some things you may want to have in a closet ready to use just in case.

This is my project right now for my family. I've decided that I have procrastinated long enough. I am trying to collect things I have around the house and put them together in one box for an emergency. My main worry is an earthquake, but there are areas around the world where hurricanes, tornadoes, typhoons, snow & ice blizzards and floods are concerns.

Check out this short instructional video explaining the key steps to emergency preparedness, including: being informed, making a plan, building a kit, and getting involved.


Another neat thing - If you have a fancy phone, you can download these neat apps!
Red Cross - mobile apps

Killer Kielbasa Kale Soup

My Killer Kielbasa Kale Soup

1 - 2 large onions roughly chopped
1 or 2 entire bulbs of garlic peeled and roughly chopped
1 lb kielbasa or sausage
2 lbs potatoes cubed
1 head kale, stems and leaves chopped up separately
2 cups milk or cream
2 Tb oregano or basil
1 cup powdered potatoes
sea salt, pepper, cayenne

This soup is similar to a chowder and very beautiful.

Saute garlic, onion and kielbasa in oil in your stockpot. Now chop up only the kale stems (half inch or smaller) and saute them a bit alongside. Add your cubed potatoes. If your potatoes are precooked this soup will cook faster. Add enough water to cover. Cook until potatoes are done. Time to add your chopped kale leaves, italian herbs and your cream or milk. I use raw cream. Boil 5 to 10 minutes and add enough powdered potatoes to thicken soup up to your liking. Salt, pepper, cayenne to taste.
Serve with crusty bread.

If the only dish for a meal, it feeds 8 people.

Costs:
2 large onions $.65
1 bulb of garlic $.43
1 lb Kielbasa $1.35
2 lb potatoes $1.00
1 head kale $.98
2 cups milk $.34
1 cup powdered potatoes $.15

Total: $4.90

FREE CURRICULUM! All Subjects


There are hundreds of textbooks, worksheets, crafts, printables, databases, games, ideas, methods, unit studies, lapbooks, literature, ebooks and plenty more. Every subject, even Bible.

Inspiring To Learn
http://inspiringtolearn.blogspot.com/


Great for any homeschool!


Teaching using a BOOK AS A SPINE

 This is a subject I have taught workshops on to help the homeschool community home educate for free.


In this post I have some "overviews" that can be used as a guide for you to use to teach from. Like a spine. These are just guides, as all curricula and teacher manuals are only a tool for us to use.(See my other post on this subject.)

The one from Heart Of Wisdom is very good. I say that especially because it also incorporates science. A nice blessing!

All overviews and especially chronological teaching should, in my opinion, use a timeline. Some families will post one along their hallway or make a big long fold up one (accordian style).

These are mostly based on a four year rotation, as is popular in current education.


Four Year plan


Four Year plan


Four year plan


Four Year plan for high school


Four Year living book list sequence


Overview plan


Overview plan


Overview plan


Overview plan year by year


Overview


Overview – editable


* * * * If you like these kinds of posts, please check out my other blog that focuses just on homeschooling on a dime:

Inspired To Learn 


Edited to add: I get a ton of "hits" on this post. An unbelievable amount! But no comments?

Spine Book teaching – making your own curriculum the easy way

Maybe you have heard of teaching using a book as a spine? 

I am surprised at how easy this is and love it. 

Teaching this way can open up your homeschool to develop a real love of learning and save you plenty of money at the same time. 
Unfortunately, there is not really any information on "how" to use a book as a spine. I've taught how to do this in person to groups and conferences but maybe I need to do a video to share with the world.
 
I did find this link here below. Hopefully it will shed some light. It is a little like mind mapping (an abstract way of doing an outline) and inspires creativity… even if you are not the creative type.

My own post on the subject:
Teaching Using A Book As A Spine ... awesome homeschooling on the cheap!

Another writer on the subject:
Teaching Using A Spine


DO YOU LIKE POSTS LIKE THIS?

Check out my blog on these and 100's of other FREE homeschool curriculum ideas, methods, ebooks and textbooks.

Inspiring To Learn 
http://inspiringtolearn.blogspot.com