Showing posts with label Self Sustainable. Show all posts

Fermenting Food For Your Chickens and BEST OF ALL... Saving Money!

Life on the farm for the chicken can be dull and routine except for the occasional discovery of a large grub all for herself. She might live in a dreary coop most of her days, she may find herself regularly chased by the neighbor’s dog, she might witness a serial killer raccoon wipe out her household or endure relentless daily torment from a bossy hen above her on the pecking order.


How is a chicken to get away from it all, get some R&R? You know really let loose?

I submit to you, The Chicken Speakeasy.
Imagine 25 chickens tipped and hopped up. The poultry party could go on all day and the barnyard full of poultry drinking songs. You may have extra chickens showing up at your doorstep asking for vacancies.
What? Yes, sort of, but they are not drunk. I would not do that to my birds. Just a joke here.

In my search for cheaper feeding of my working laying birdies, I ran across great information on self-feeders, maggot breeding stations, cracked corn, and rotational grazing. All of these methods are pretty good and all merit attention. Someday soon I will be making the maggot feeder. What caught my eye was the “wet feed”. When you feed your poultry the standard pellets they are dry. The theory is that the chickens will consume more food if it is dry and then drink great quantities of water. Simply add water to the feed pellets and they are fuller faster and eat less. If we stopped right now and this is all you took away from my article, you would be a blessed poulterer indeed. Because it is true. I know it is because I have seen this myself. But wait a minute there is more.

Further study started to reveal some interesting information. Folks were adding apple cider vinegar to the birdy drinking water to reap lots of benefits. They were also sprouting or fermenting the grains they were throwing out to their poultry. Oh yes. First thought I had was, “These people must worship their chickens.” And they may actually do that, what do I care. But the fact is that the reduced food consumption may outweigh the costs of spending so much money on grain. On our place we do not worship or pamper the ducks and chickens. No grain. They get Layena, kitchen scraps and forage to their little hearts content. Pretty good, I think. I started mulling all these ideas around and eventually thought- What if I fermented the Layena pellets? Turns out that I am not the girl genius who first thunk it.

In any case, I followed the basic instructions a gal gave for fermenting her grains she threw to her Cornish Cross meat birds. A couple days later I had some seriously rockin’ poultry feed ferment going on and decided the party was going to begin.

Upon my approach to the coop that morning I was greeted with hello songs. When I poured the slop in the pan, they were looking at me like I forgot something. No one touched it. Sigh. Whatever… you can just stay in there until you eat it. No foraging for you! Next day I waited until afternoon to check on them just to make sure they had gotten hungry enough to eat the food. I got my customary happy greeting and when I dumped more hooch in the pan they all dove for it like there was a sale at their favorite store. Wow. These birds were already hooked. Even my ducks liked it. The Chicken Speakeasy was in business.

Since I began this I have seen my feed rate drop to an unscientific "guesstement" of about 60% of what I used to shell out. Around these parts a 50lb bag of Layena is $18 and I fully expect that price to skyrocket this year with the corn issues and drought. This is why I searched for answers in the first place. The bonus is that my birds are healthier, happier and the coop smells better too.

Okay so how does it work?

This project will take you 5 minutes and $10. Less if you have stuff lying around.
1 – 5 gallon bucket $3
1 – 5 gallon Lid $2
1 – 2 gallon bucket (free at the bakery)
1 – quart bottle Bragg’s ACV $5
1 – Drill
Water
1-100 Chickens who want to party


Basic instructions are you start with a plastic trash can and a 5 gallon bucket, if you have a large flock of birds. Smaller operations can just use a 5 gallon bucket and a 2-3 gallon bucket. Whatever the case, you will need a lid for the larger container to keep out the unfriendlies.


Fermented Chicken Feed Fermented Goat Feed Fermented Goat Feed


Drill a lot of holes in your smaller bucket bottom and up the sides. My picture here shows the holes drilled only on the bottom. You need small holes or too much feed comes through the holes when it gets lifted out. Plenty of holes will ensure enough water escapes when you lift it. You’ll see why soon. Dump a couple cups or a quart of apple cider vinegar (ACV) into the larger bucket/trash can. The ACV must be unpasteurized. The most commonly found brand is Bragg’s. Fill your bucket or trash can no more than half the height of your smaller bucket. Now fill your small bucket about half full of feed: grain or pellets or a mix. Push it into the water ACV until it floods through the drilled holes. Looks nasty? Just wait, it gets worse. Put a lid on that thing and I recommend you put it in your garage. Not in the house and not outside where something may get into it. I let my lid breathe it a bit.


Fermented Chicken Feed Fermented Goat Feed Fermented Pig Feed Fermented Livestock Feed

(The basic set up before ACV and water)


Some folks love the smell of ACV- I am one of those “interesting” people who do too. When you check the fermenting feed in a couple days, it should be ready to feed your eager birds. You know it’s ready if it is bubbling. Give it a gentle stir just to see what going on. Yep, it smells stronger. Perfect. Carefully pull your small bucket up and let it drain out as much liquid as you can. You could lay a couple sticks across your larger bucket and set the draining bucket on that to save your fermentation liquid. Come back in 20 minutes. My first attempts at draining were NOT with my revolutionary-amazing-super stick trick. Hah! I made a mess of it those times. More holes drilled into the side of the smaller bucket also help drain off the hooch. Add more water to the larger bucket if you need to, possibly every day.
Fermented Chicken Feed Fermented Goat Feed Fermented Pig Feed Fermented Livestock Feed


(Your ferment could look either way, but pic#1 is ideal)


After the first batch, you will get faster results because you have more fermented liquid to work with. One day should be fine to complete fermentation. Keep the stuff out of the cold weather to speed up things. You do not need to empty all the fermented feed out of the bucket before adding more pellets or grain to start working.


If you like the small 5 gallon bucket size and want to have more feed available for use you could always make more than one system. They are small and store anywhere.

OR go bigger- and use a half sized outdoor trash can. Get one of the shorter types so you can reach in easily. The interior bucket could be the 5 or 6 gallon size. Be sure to drill plenty of holes as this will be heavy to lift out. Either that or you will end up scooping with a nice strong colander. Nothing wrong with that. Just plan ahead.

When we get any other livestock (working animals) we plan on fermenting anything we give them too. Fermented and cultured foods are extremely beneficial for people. Now folks are giving it to their animals so they may share in the benefits. This has been a huge success for our farm and we want the success to continue.

Now that you know, what are you waiting for? Make your own Chicken Speakeasy!


Stop! Don't eat that! -- What foods are the worst for pesticides? The Dirty Dozen

Dirty Dozen InfographicIf you are trying to feed your family better... more healthy, more whole food, less bad fat, less GMOs, less pesticides and so on, then you will appreciate this new info-graphic that has been released.

There is a lot of information here but they have attempted to make it easy for all of us to scan quickly.

For me, I always knew that grapes were "naughty" so I never buy them. Like never ever. Washing them would be impossible. Which is sad because I absolutely adore them. So do my children. I also knew apples had junk on them, but I figured washing them was good enough.
Now I am rethinking that.
Just washing them is not going to do it. These chemicals are IN THE FOOD. Part of it's make up. 

I don't want to fly off in a paranoid frenzy, that's just not me.

However, now I know even more how important my garden is and that I need to ensure that these foods need to be grown myself. 
This is for my family.
It's my job to make sure what they eat is safe and healthy.
If I can't afford to buy it, that's no excuse because I could always grow it... whether in a garden plot, backyard or in containers.

Do you know that 25 strawberry plants are only $15-$25? If you buy the "everbearing" type then you will have strawberries all spring, summer and through fall. Surely you'd have paid yourself back many times. Plus they grow most anywhere and come back every year!! They even send runners so you can propagate more plants or give them to your friends or a family in need. Maybe you can post them on Craigslist for free or for a few bucks? Just don't throw them away. Buy them from a smaller company like Territorial Seed, if you can. Their strawberries are $17.50 for 25.
Tomato plant starts are $2.50-$4 for a 6 pack. Folks, tomatoes are $2-$3 a pound in the store for un-organic. You can do the math yourself to see you are a winner no matter how many tomatoes you get off just one plant. There is no beating homegrown tomatoes.

In any case, you can see that you can make a difference. EVERYONE can grow SOMETHING. The Lord made it easy for us. In today's world there is a lot of free info on the net and youtube videos on every kind of growing method or plant variety.

Your family deserves it.
YOU CAN DO THIS!

[You can click the poster here to see it larger. Then you hover your mouse over and enlarge.]
http://d4h0mkqj50y6.cloudfront.net/wp-content/uploads/DirtyDozenInfographic.jpg

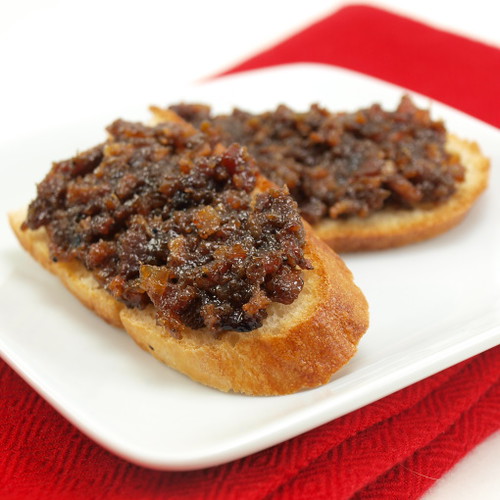
Maple-Bacon Jam.... mmmmm bacon bacon bacon


Stop the presses! 

I ran across this amazing jam and just knew the whole world needed to know about it! Stop everyone you see and send out the good news! Hearts everywhere have been dreaming of this and now it has come to fruition! So, let your joy filled heart say, "Yes!" and run to your kitchen. In no time you will have such a delectable delight that angels will sing and grown men cry.

Maple-Bacon Jam

Sweet, salty, smoky, spicy and down right tasty bacon jam that is the definition of YUM! This bacon jam goes well on toast for breakfast and makes for a great condiment in sandwiches and burgers of all sorts! 

Servings: makes 1-2 cups (Recommend you DOUBLE or triple!) 
Prep Time: 10 minutes 
Cook Time: 1 hour 50 minutes 
Total Time: 2 hours 

Ingredients 
1 pound thick smoked bacon, cut into 1 inch pieces 
1 large onion, sliced 
4 cloves garlic, chopped 
1/4 cup cider vinegar 
3/4 cup coffee (brewed) 
1/4 cup brown sugar 
1/4 cup maple syrup 
1/4 cup bourbon, optional
1-2 chipotle chilis in adobo, chopped 
1/2 teaspoon cumin pepper to taste 

Directions 
Cook the bacon in a large sauce pan an over medium heat until the fat has rendered and the bacon starts to get crispy and set aside, reserving 1 tablespoon of the grease in the pan. Add the onions and saute until tender, about 5-7 minutes. Add the garlic and saute until fragrant, about a minute. Add the vinegar and deglaze the pan. Add the coffee, brown sugar, maple syrup, bourbon, bacon, chipotle chilies, cumin and pepper, reduce the heat and simmer until reduced to a syrupy consistency, about 1-2 hours. 
Process the jam in a food processor to smooth it out a bit but not too much as you want to have the texture of the bacon. If you do not finish it all in one sitting, store it in a sealed container in the fridge for up to 4 weeks. 

Culturing and Fermenting: Kombucha


Culturing and Fermenting: Kombucha

Several years ago, I was talking with someone about culturing and fermenting and she introduced me to the word “kombucha” with a brief description of what I needed to do to feed and culture kombucha. Intrigued, I went home and looked up more information. For those not currently doing culturing or fermenting do a little exploring on the subject. There is an entire underground community sharing information on this topic. “Nourishing Traditions” by Sandy Fallon talks a great deal about kombucha and all sorts of fermenting and culturing. The book in general is a great self-sustainable person’s resource which covers many subjects that are not limited to culturing. The Weston A. Price Foundation (WAPF) is a wealth of information, too. Kombucha is mega healthy. It cures quite a long list of surprising health issues. Most of us do not get enough fermented or cultured critters into our bodies to maintain our systems correctly anymore. In our family, My husband and I drink it and the children are always asking for it. You just can’t keep enough on hand so if you start making it, double your recipes after your first batch or two.

Kombucha. Well, what is it? It is often described as a mushroom (but its not one) or more accurately a probiotic bacteria & yeast colony. Its job is to create a lovely beverage for you. As culturing goes, the super hero in question here is ugly, phlegmy in appearance and looks like it should be thrown out upon first sight. You will soon fall in love with it’s slimy slippery goodness that creates a delightful super-healthy beverage resembling sparkling apple cider with a hint of apple cider vinegar tang to it. No lie. It is amazingly delicious and you are missing out.

Wait a minute, did I say slimy and slippery AND delicious in the same description? Yes. I did. The actual beverage you would drink is not slimy- only the probiotic colony that creates the drink is. The kombucha “tea” created is refreshing whether lukewarm or cold. Some folks even drink it hot and that would be great too, but it would kill off any live critter goodness in the drink.

When I received my first kombucha mushroom or scoby (S.C.O.B.Y.: Symbiotic Colony of Bacteria and Yeast) I was having some thoughts of backing out. I confess, I too did not have love at first sight. After following the standard directions, I put the whole ensemble in the pantry and hoped for the best but had my doubts. About 10-14 days later I pulled out the jar, pulled off the cloth covering the opening and surveyed the landscape. Toledo! I was -not- going to consume that. After confessing my dismay on a culturing forum, they laughed at me and pretty much dared me to try it. That worked and I poured a bit of the kombucha off into a glass and sipped. No, I did not die but I sure was surprised! And a kombucha believer was born that minute.
Kombucha scobys live off of the caffeine made by black tea and white sugar. That means the scoby eats the caffeine and sugar and replace it with live critter probiotics, so rest assured you are not getting a sugar/caffeine buzz here... or consuming scads of white sugar, which many people avoid at great costs.
Okay now, are you ready? Strap yourself in for some pictures to go along with this kombucha “tea” extravaganza, folks.

First you will need to acquire a scoby, a large gallon glass jar, very clean muslin or flour sack fabric (about 8 x 8 inches), wooden or plastic spoon, some regular black tea bags, white sugar. You do need white sugar and yes your tea must be black with the caffeine still in it. These are the rules for a happy scoby and a happy scoby will show you love in return.


Wash your hands. Boil about 15 cups of water. Pour off some into a glass, heat tolerant jar of some kind, preferably a 4 cup measurer for convenience. Two or three cups will do.
Place 10 tea bags in this water you poured off. Let sit 10 minutes and squeeze the tea bags out well without breaking them.
Pour your 1 ½ cups white sugar into the gallon jar and add your concentrated tea mix. It is important to stir sugar in until completely dissolved.
Now cool everything to room temperature. We don’t want to kill our new best friend before we even get started, right? Sure she looks like a snotty pancake, but give her a break! She works hard. It usually takes a couple hours to cool down so allow yourself this time in your day when you make a new batch of kombucha.
[Note: whenever you stir or transfer or decant kombucha or touch the scoby in any way, you cannot use metal of any kind. Wood, plastic or your clean hands only.]
Pour your large portion of cooled water into the gallon jar but leave about 2-3 inches head space. Wash your hands again. Your scoby is anxiously awaiting her new home, go find her now. Open the scoby packaging or jar carefully and pour off any liquid INTO your lukewarm sweetened tea concoction and take care with your scoby that she does not get too excited and jump right in too. Gently assist your scoby into her new cozy sugary caffeineish home. I highly recommend you use your hands to help ease her in. Just look at her in there! She’s happy. You did it!
Get your square of clean muslin or flour sack and place over the jar opening and secure with a nice thick rubber band. Grab a post-it and put today’s date with “10 teabags, 1 ½ cup sugar” and put it on your jar.
Place your jar in a closet or your bedroom if it is dark in there, where no one will be harassing her as she’s working.
After 10 days carefully bring her back to the kitchen, it’s show time. It’s your turn to be brave now. Do you have a nice clean turkey baster or a plastic ladle? Get it out. Take your cloth that keeps fruit flies, spores, dust and all manner of yuckness off your jar. There she is. Scared? Don’t be. Gently slip your baster or ladle along the inside of the jar edge to retrieve some kombucha and put it in a cup to try. Go ahead! See, I told you! She was worth it wasn’t she?

If you find the current stage of culturing is still a bit too sweet, cover her back up and put her back to work in the dark pantry you had her in. Check on her in a few days and repeat the process. My family likes kombucha “brewed’ for about 3 weeks. We like the sweet and slightly sour tang and increased effervescence. Like sparkling apple cider.


Now we are at decanting stage. Pull your scoby and any slimy stringiness out and place her in a nice cozy glass bowl. Use a slotted spoon if you must to get a decent amount of any stringy things.


Ladle or pour your kombucha into pint size canning jars and use the standard lid & band combo. Pint size is perfect for drinking and not too much fizz is lost between partaking. Tighten well to keep the bubbles in there or it goes flat. Flat is fine, just not as good. Put a few in the fridge to start chilling if you like it cold. No refrigeration is necessary. You do need to know though that the longer it sits the more vinegary it will be but usually that is a couple months when it becomes too tart. At least for us. If we find it is a bit too strong we add a bit of water to our glass and it’s fine. Guess you could use your too tart kombucha as a hair rinse or in salad dressing.
Reserve some kombucha as starter to go back into your new batch you are making now.
You remembered to prep your water and tea all day first for your scoby to go live in again, right? After all, she can’t be homeless. You'll need to have her home ready in advance of decanting.
Let’s look at your scoby now. Notice how she seems to have two parts now? Like she divided? The scoby you found floating on top of the kombucha tea is the “baby” and the scoby thing below it, perhaps on the bottom of the jar is your “mother” scoby. The mother is the original scoby you put in there, the baby is your new scoby. Good news: You can use BOTH scobys. Gently separate them if they are attached in some way.
Here are different examples of a scoby mother not floating on top while her baby is on top. Various combinations do occur though.


Give one away to a friend you know will be a good adoptive parent OR make 2 gallons of kombucha this time. Put the baby in one jar and the mother in the other. Simple. Both work and love just the same. Some people actually put “extra” scobys in the compost or out to the chickens. Don’t do such a thing. There are people everywhere scratching and clawing to get one. No one should ever have to pay $20 for a scoby. Share the love.
Enjoy the adventure. To your health!

A Day In The Life Of A Kefir Grain


Every morning I make kefir for my family. Actually, the kefir grains have been making the kefir for the last 24 hours, but I strain out the kefir grains and start a new batch.


First you must start out with at least 1 cup of LIVE kefir grains. Not powder kefir starter like you can buy in a health food store. Kefir grains cannot be bought at your local healtfood store. These have got to be alive and happily will continue to reproduce forever. You can get live kefir grains for sale on Ebay or
GemCultures. There are forums/boards online where you can get them free for just the cost of shipping. After learning of this, that is how I got mine. I did not pay $20 for my grains. Although, they are certainly worth it.


What is kefir?
Everything you could possibly imagine or ask is on this site here: Dom's Kefir Making & Information


One starting hint: it takes about 2 to 3 weeks for your kefir grains to fall in love with you once you get them. They need daily batches made until you get the process down (and tweak your ratios of milk to grains) and time for them to adjust to your schedule of adding new milk. You also MUST use a blender to make a beautiful smooth kefir to drink or use in cereal.


Today I am dividing my grains. I have too many. I have to add too much milk to get the right consistency now because my grains have multiplied. Which is great for someone because they are the blessed recipient of my extras! I will be mailing the extra to a gal in NC. Shipping from Oregon all the way there is no problem because you add some milk to the ziplock and then place a second ziplock over that one to be sure. Then you add extra padding around that packaging to protect them before they get put in a mailer.


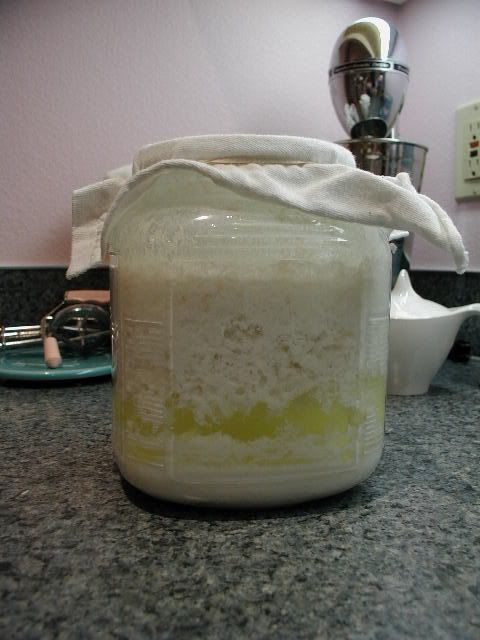
Here is my kefir before doing anything to it. I have left it for 48 hours instead of the normal 24, but that is okay. You can see that there is a lot of whey present. That is the yellowish liquid. That is what should happen, but today there is more whey because I let the kefir sit for an extra day.

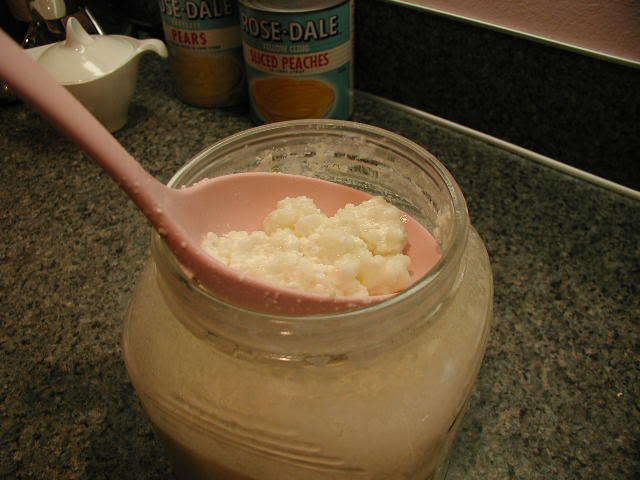
I gently stir the kefired milk and grains to loosen them from each other just a bit. It makes straining them easier. Straining them requires a slotted spoon. The larger the slots in the spoon, the faster this process is, but the catch is that you will lose more of the tiny grains that are growing. I am really careful to watch for the "babies".
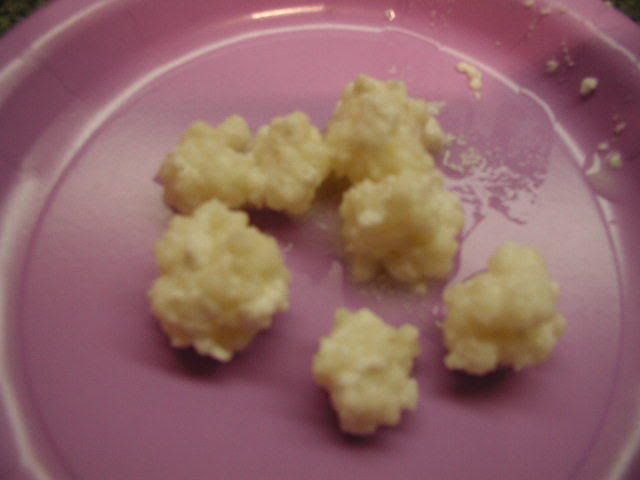
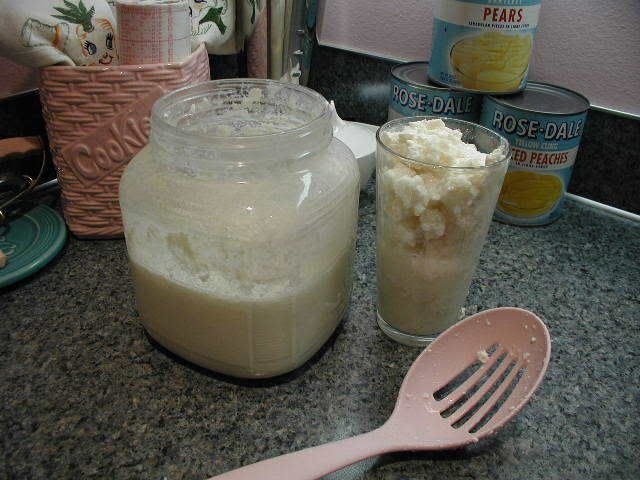
Here are some kefir grains. The are about the size and shape of popcorn.


After sorting through the jar with my spoon for a couple minutes, I am sure I got the majority of the grains. I place them in a glass as I pull them out. Some of the liquid is still in with the grains and fills the bottom of the glass. This entire glass is full of grains! Definitely time to divide my grains!


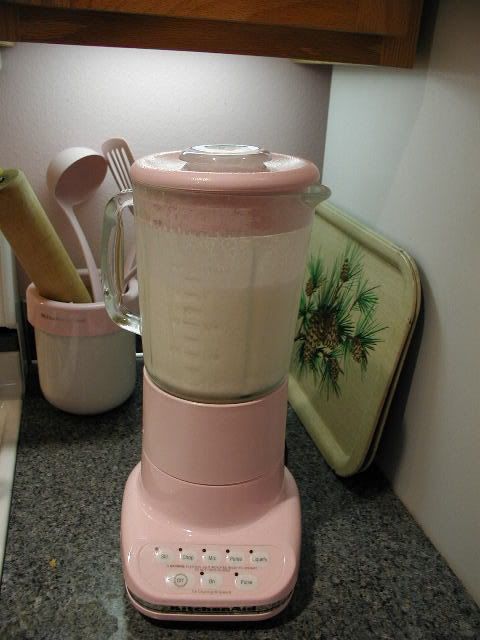
Now I will pour the remaining kefired milk through my spoon and into my blender. This is to catch any grains or baby grains I missed. Some people just blend the babies in with the kefir for extra health benefits. We do not.


When I blend the kefir, I add 3 tablespoons of sugar and hit "mix" for about 10 seconds. Then the second highest setting for 20-30 seconds. Sometimes I blend for a little longer to get it a bit frothy. At this point in the process, some people add fruit or some extract. We sometimes add frozen blueberries because we have a lot of those on hand. Usually we just drink it with the sugar and love it that way.


After blending, someone is always waiting there by my side asking for some. If we do not drink it all, that is okay. I am putting it all (blender too) in the fridge. I just keep the blender in the fridge so I do not have to wash it so often (daily or more). Kefir keeps for a very long time.


Some people will wash their kefir making jar out that they make the kefir in every day. This is completely not necessary. Even a waste of time. I wash mine out about once a week or so.


When you do wash your jar, rinse it out several times with cold water to cool the jar down before adding the grains.


Now we will start a new batch. I put half of my grains back into the jar and hold back the other half to mail. Otherwise all of it would have gone back into the jar.


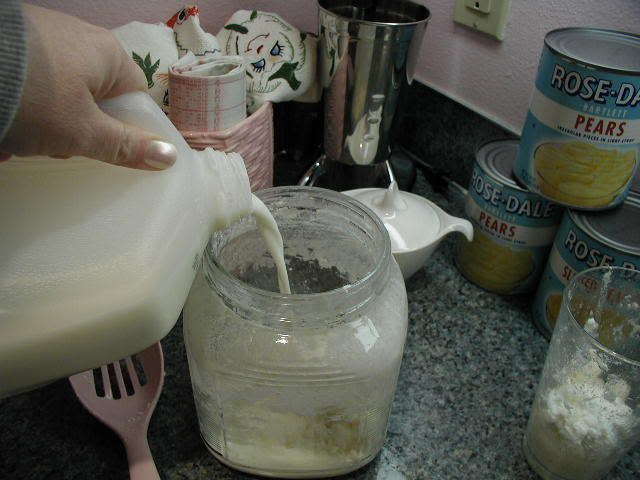
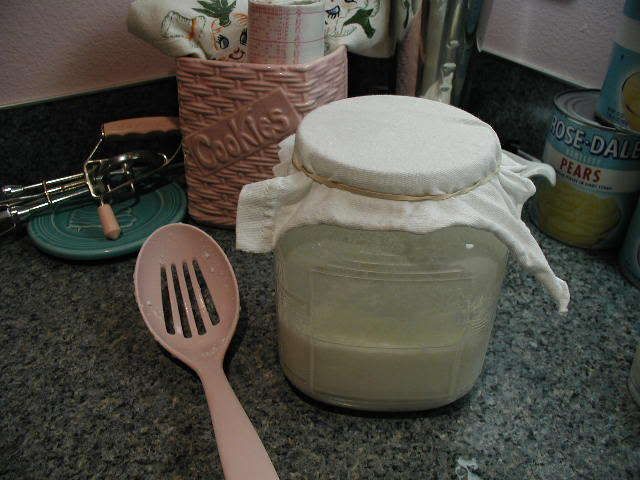
Then I pour regular store bought milk straight from the jug into the kefir jar. Whole milk or 2% tastes best, but some people like to use less fat in theirs. I pour to fill my jar to about half full. This is a half gallon jar. You can get these at Walmart. Some room in it is good, as it makes it easier to slosh around a bit once or twice while kefirring. The agitation allows more contact to the milk for the grains- but this is not a necessary step. When I have enough milk in it, I put a square of t-shirt fabric over the jar with a rubberband to keep out fruitflies and to allow the carbon gas to escape. This will sit on my counter or in my pantry until tomorrow morning when I start it all again.

Yay! This is so wonderful... and "free". No more paying $3-$4 for one quart of kefir!


Waiter! There's something alive in my food!


 I have been pining away for some kefir grains to make my own kefir for quite some time now. We drank it as children and adored it!! I enjoy kefir quite a lot as an adult and hate paying so much for it at the health food store! Because it is so spendy, I rarely will buy it. I found a place online that sells kefir grains for $20. I thought, hey that would be great! Live culture kefir to give to my family regularly!


Kefir: A fresh cultured milk with probiotic cultures, billions in every sip. Good for you bacteria. Not only does it keep digestive and immune systems intact, it helps prevent common side effects from taking antibiotics, helps with lactose intolerance and weight loss. Plus, it's an excellent source of calcium, protein and fiber. In short, super healthy!!


I was getting up the nerve to blow $20 once and for all recently when a friend of mine and I were talking. The subject of kefir and kombucha came up. I know I have had kombucha iced tea that I bought somewhere. I cannot remember what it tasted like. Well, my friend said she has been brewing her own kombucha tea and said she loves it. She said she knew where I could get a better price on kefir if I was going to get some. I was so intrigued!


Right away I ordered the kefir grains and kombucha! (Okay, I am a little nervous about the kombucha!!) The kefir grains are here already and we drank our first batch this morning. YAY! Kefir is soooooo good for you! I put some in my little one’s bottle to share the probiotic lovin’!


Now when the kombucha shows up later this week, I will have to make black tea with sugar and cool it. Then add the kombucha “starter” (aka scoby) to the tea, at which point it should set for 7-10 days.

Clearly there is more involved when you make kombucha. In contrast with kefir- just pouring some milk over kefir grains and letting set 24 hours!


If you want to know more about live culture foods and what an amazing thing this is that God gave to us for our health, just do a search on “fermented foods health benefits”, “making kefir” or “making kombucha”.

See this cool site!  HOW TO MAKE KEFIR